Blood Electrifier Setup Guide for Beginners
If you have opened a blood electrification device box and immediately wondered which wire goes where, you are not alone. A good blood electrifier setup guide should make the first session feel less like guesswork and more like a clear, repeatable process. That matters here, because setup affects comfort, consistency, and whether you can use the device with confidence.
This is one of those wellness tools that attracts curious, motivated users but often comes with scattered instructions. Some devices are sold as part of a broader Bob Beck-style kit. Others come as stand-alone units with wrist electrodes, cables, conductive pads, or pre-set frequencies. The basics are usually similar, but the details can vary, so the smartest approach is to learn the core setup logic first and then match it to your specific model.
What to prepare before setup
Before you connect anything, start with the simple things that people tend to skip. Check that your device is clean, dry, and visibly intact. Look over the cables for fraying, inspect the electrode contacts, and make sure the power source is ready. If your unit runs on a battery, confirm it has enough charge. If it uses replaceable batteries, install fresh ones if there is any doubt.
You will also want a comfortable place to sit for the session. Since blood electrification sessions often last long enough that posture matters, choose a chair where your arms can rest naturally. Keep the device on a stable surface rather than balancing it in your lap. A rushed setup usually leads to loose connections or awkward electrode placement, which can make the session less comfortable than it needs to be.
Skin prep matters more than many beginners expect. Clean the wrist area or the electrode contact points with mild soap and water, then dry thoroughly. Oils, lotion, or heavy sweat can interfere with contact. Better contact does not necessarily mean stronger intensity. It usually means more stable delivery and a more even sensation.
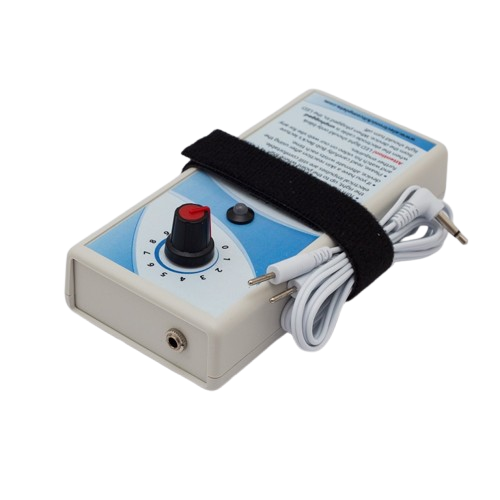
Blood electrifier setup guide: assembling the device
Most blood electrifiers follow a basic chain: power source, main unit, lead wires, and electrodes. Start by connecting the cables to the main unit exactly as labeled. If your device has color-coded ports or left-right markings, follow them carefully. Reversed or loose leads may not damage every unit, but they can create confusion when troubleshooting.
Next, attach the electrodes. Depending on the design, this could mean clipping leads to wrist straps, snapping them onto conductive pads, or securing metal contacts built into a wrist cuff. The goal is snug contact, not excessive tightness. If a strap is too loose, the signal may feel inconsistent. If it is too tight, it can become distracting and uncomfortable.
Once connected, power the device on and verify the display or indicator light behaves normally. Some units show mode, frequency, or intensity immediately. Others remain idle until the controls are adjusted. If the screen is blank, first check the obvious issues: battery direction, power switch position, cable seating, and whether a safety lock or timer setting is active.
A common beginner mistake is turning intensity up before the electrodes are fully in place. Set the output to zero or the lowest setting first. Then position the electrodes on the wrists according to the manufacturer instructions for your device. Only after everything is seated properly should you begin adjusting output.
Electrode placement and contact
For many blood electrification devices, wrist placement is the standard approach. The electrodes are usually positioned so the current path moves through the circulation route the device is designed to target. The exact position can vary slightly by strap design, but consistency matters more than obsessing over millimeters.
The contact should feel secure and even on both sides. If one wrist is making better contact than the other, the sensation may seem uneven. That does not always mean the device is malfunctioning. It often means one electrode is drier, looser, or sitting at a slightly different angle.
If your model uses dampened conductive material, use only the amount of moisture recommended in the instructions. Too little can reduce contact. Too much can create mess, slipping, or erratic sensation. This is one of those areas where more is not better.
How tight should the wrist electrodes be?
They should be snug enough to maintain steady contact and loose enough that they do not pinch, cut into the skin, or feel restrictive. If your hand starts tingling from pressure rather than the device output, the strap is probably too tight. Comfort matters because sessions are easier to complete when the setup feels stable instead of irritating.
Choosing the right starting settings
This is where caution beats enthusiasm. If your device allows manual adjustment, start low. Many new users assume they need to feel a strong sensation for the device to be working, but that is not the right benchmark. With blood electrification devices, more intensity is not automatically more effective. In practice, too much output can make the session unpleasant and discourage consistent use.
Begin at the lowest setting and increase gradually until you notice a mild sensation, if your device is designed to be felt at all. Some users describe it as light tingling or a faint pulse. Others feel very little. Skin sensitivity, hydration, electrode quality, and individual tolerance all play a role.
If your model includes preset timing, use the standard beginner duration rather than experimenting with extended sessions right away. If timing is manual, follow the guidance that came with the unit and stay conservative at first. The goal of your first few sessions is not to push limits. It is to learn what normal setup, normal contact, and normal sensation feel like with your device.
Blood electrifier setup guide: first-session safety checks
Before every session, run through a quick mental checklist. Are the cables secure? Are the electrodes clean? Is the skin intact and irritation-free? Is the output starting at the lowest level? Small habits like these reduce avoidable problems.
It is also wise to sit through your first session without multitasking. Do not treat setup day as the time to walk around, work out, or test whether the device stays attached while you do chores. Stay seated, pay attention, and get familiar with how your body responds.
People with implanted electronic devices, serious heart concerns, seizure disorders, pregnancy-related concerns, or other significant medical issues should be especially cautious and seek qualified medical guidance before use. This category is not one to treat casually if you have known contraindications. Alternative wellness tools can still require very conventional common sense.
If you notice pain, dizziness, unusual skin irritation, or anything that feels off, stop the session and reassess. Sometimes the issue is as simple as poor electrode contact. Sometimes it is a sign the device or settings are not appropriate for that moment.
Common setup problems and simple fixes
The most common complaint is no sensation at all. That can happen because the battery is weak, the leads are not fully connected, the electrodes are too dry, the intensity is still at zero, or the unit is functioning normally but producing a sensation that is simply subtle. Start with the basics before assuming the device is defective.
The second common issue is too much sensation, especially a sharp or annoying feeling. Usually that points to poor contact, overly dry electrodes, intensity set too high, or straps pressing unevenly into the skin. Lower the output first, then adjust contact.
Some users also notice mild redness after removing wrist electrodes. Light temporary marks can happen from pressure or contact, especially early on. Persistent irritation is different. If the skin stays inflamed, reconsider strap tightness, material sensitivity, cleanliness, and session frequency.
If your unit seems inconsistent from one session to the next, look at your routine. Using it with lotion on the skin one day and dry skin the next can change contact. So can battery level, electrode wear, and even how carefully the straps are positioned.
Building a routine that stays practical
The best setup is the one you can repeat without stress. Keep your device, accessories, and cleaning supplies together in one place. Wipe down the electrode surfaces after use, let everything dry if needed, and store the cables without tight bends. That simple habit helps the equipment last longer and makes future sessions much easier.
If you are using blood electrification as part of a broader Bob Beck-style routine, avoid the urge to change everything at once. It is tempting to stack multiple devices and protocols immediately, but beginners usually learn faster when they introduce one element carefully. That way, if something feels uncomfortable or confusing, you know what caused it.
This is also where a focused resource can help. Sites like bloodelectrificationdevice.com are useful because they organize device education in one place instead of leaving you to piece it together from old forum posts and mixed product inserts.
A blood electrifier is not the kind of tool that rewards guesswork. It rewards calm setup, conservative starting points, and attention to detail. Once those pieces are in place, the process usually becomes much less intimidating and a lot more manageable.