
How to Make Colloidal Silver: A Step-by-Step Beginner’s Guide
When I first started researching how to make colloidal silver, I felt the same mix of excitement and confusion you might be feeling now. You’ve heard about the benefits, but the process itself-with its talk of pure silver rods, distilled water, and electrical currents-can seem complex and even a little risky. What if you use the wrong water? How do you know when it’s strong enough? These are valid questions that stop many people from taking control of their own supply and saving a lot of money in the process.
Forget the uncertainty. I created this guide to give you a clear, simple, and safe path forward. Here, I’m going to walk you through the entire process, step by simple step. We’ll demystify everything from choosing the right equipment to creating a high-quality final product you can be confident in. By the end of this article, you will have a foolproof method for making effective colloidal silver right in your own kitchen, empowering you with knowledge and self-sufficiency.
Key Takeaways
- Discover the essential tools you need to ensure you create a safe and high-quality batch of colloidal silver every time.
- Our guide breaks down exactly how to make colloidal silver at home with a simple, step-by-step process anyone can follow.
- Learn to identify and avoid the common mistakes beginners make, from using the wrong water to getting the color wrong.
- Understand the important connection between making your own colloidal silver and the pioneering research of Bob Beck.
What You’ll Need: Gathering Your Colloidal Silver Toolkit
Welcome to the first step on your journey to self-sufficiency. Learning how to make colloidal silver at home is a straightforward process, but the quality and safety of your final product depend entirely on the quality of your starting materials. Purity is the single most important factor. Using impure components can lead to a completely different, and potentially harmful, substance. Think of it like cooking: the best ingredients yield the best results. Before we begin, it’s important to state that this guide is for informational and research purposes only and should not be considered medical advice.
The #1 Most Important Ingredient: Distilled Water
This is non-negotiable. You must use only steam-distilled or deionized water. Tap water, spring water, and even filtered water contain minerals and impurities. When you introduce an electrical current, these minerals will react with the silver to form unwanted compounds like silver chloride. This creates a cloudy, ineffective solution. You can easily find distilled water in any supermarket or pharmacy, usually in the water aisle or near the ironing supplies.
The Silver Source: Pure Silver Rods or Wire
Your silver must be at least .999 (99.9%) pure, with .9999 (99.99%) being the gold standard. Do not, under any circumstances, use Sterling silver. Sterling is only 92.5% silver, with the other 7.5% typically being copper, which you do not want in your solution. The long history of the medical uses of silver is based on its pure elemental form, not alloys. You can find pure silver wire or rods from reputable online bullion dealers or specialized colloidal silver suppliers.
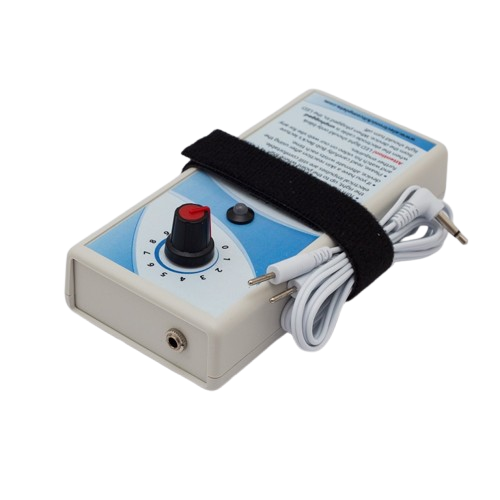
The Power Supply: A Simple and Safe Voltage Source
You need a low-voltage DC power source. The simplest method involves clipping three 9-volt batteries together in series to produce 27 volts, which is a great starting point. You will also need a pair of alligator clips to connect the batteries to the silver rods. For those who want a more permanent, all-in-one solution, a dedicated colloidal silver generator is an excellent investment that manages the voltage and current for you.
Your Workspace: Container and Tools
The process must be done in a non-reactive container, which is why a clean glass jar (like a pint or quart Mason jar) is perfect. Never use metal or plastic containers, as they can leach contaminants into your solution. It’s also helpful to have a non-conductive item, like a small piece of wood or plastic with two holes drilled in it, to hold your silver rods in place and prevent them from touching. A small laser pointer is also useful for checking your progress later on.
Here is a simple checklist to ensure you have everything before starting:
- Water: 1 gallon of pure, steam-distilled water.
- Silver: Two 6-inch rods or wires of .999 or .9999 pure silver.
- Power: Three 9V batteries and connectors, or a dedicated generator.
- Connections: A set of alligator clips.
- Container: A clean 16-32 oz glass jar.
- Holder: A non-metallic holder to suspend the silver rods.
The Science Made Simple: How Electricity Creates Colloidal Silver
Before we get into the step-by-step instructions, it’s important to understand what’s actually happening in that jar of water. Now, I’m not a scientist with a fancy degree; I’m a researcher and electronics hobbyist who has spent years figuring this out through practical experience. The process behind how to make colloidal silver is called electrolysis, and it’s surprisingly simple when you break it down.
Think of your two silver rods as being full of countless tiny particles. When you pass a gentle, controlled electric current through them, it coaxes these microscopic particles to leave the rods and jump into the distilled water. They don’t dissolve like sugar; instead, they become suspended, floating evenly throughout the water. This controlled reaction is the heart of the entire process.
What is Electrolysis?
In our case, electrolysis is simply using a low-voltage electrical current to create our silver solution. The current travels from one silver rod (the anode) to the other (the cathode) through the water. This electrical pressure causes silver ions and nanoparticles to detach from the positive rod and disperse into the water, where they remain suspended due to a small electrical charge. It’s a clean, straightforward chemical reaction you can perform safely on your kitchen counter.
Understanding PPM (Parts Per Million)
You’ll often hear the term PPM, which stands for Parts Per Million. This is just a way of measuring the concentration-how much silver is in the water. A common mistake is thinking that a higher PPM is always better. For most applications, a concentration between 5 and 20 PPM is ideal and what most homemade batches produce. It’s important to understand what different concentrations mean, as government health sites like the National Center for Complementary and Integrative Health have published articles like Colloidal Silver: What You Need To Know, which discuss risks associated with improper use. While a TDS (Total Dissolved Solids) meter can give you a rough estimate of PPM, it’s not perfectly accurate because it measures conductivity, not actual particle count.
Why Particle Size Matters
This is perhaps the most critical part of understanding how to make colloidal silver correctly. The goal is to create the smallest possible silver particles, ideally in the nano-size range. Smaller particles have a greater surface area, which is believed to make the solution more effective. They also stay suspended in the water better, resulting in a stable, clear solution. Using a low, steady voltage is the key to achieving this. Rushing the process with high voltage can create larger, less desirable particles that fall out of suspension and are less effective.

The Step-by-Step Process: Making Your First Batch Safely
You’ve gathered your equipment, and now you’re ready for the exciting part. Don’t be intimidated; this process is straightforward and rewarding when you follow the steps carefully. I’ll guide you through the four simple phases: preparing your setup, starting production, monitoring the progress, and finally, storing your finished colloidal silver properly. Let’s begin.
Step 1: Preparation and Setup
Think of this stage like setting up a clean kitchen. Any impurities can affect your final result, so cleanliness is key. Wash your hands, the glass jar, and the silver rods thoroughly with soap and water, then give them a final rinse with a small amount of your distilled water.
- Fill your clean glass jar with distilled water, leaving about an inch of space at the top.
- Secure your .9999 pure silver rods in your holder so they hang parallel inside the jar. Crucial Safety Check: The rods must not touch each other in the water. This would create a short circuit and stop the process.
- Attach the alligator clips to the rods and then to your power source, but leave one final connection open. We’re all set, but we haven’t flipped the switch just yet.
Step 2: Starting the Production
This is where the magic begins. Go ahead and connect that last alligator clip to complete the circuit and start the flow of electricity. You won’t see a flash or hear a sound. Instead, look closely at the silver rods. You should start to see a very gentle stream of tiny bubbles, almost like a faint mist, coming off one of the rods. This is electrolysis at work! Patience is a key part of learning how to make colloidal silver correctly. Find a stable spot for your setup where it won’t be disturbed, and let it run.
Step 3: Monitoring and Knowing When It’s Done
After a few hours, you can check your progress using a simple laser pointer in a darkened room. Shine the laser through the jar; initially, the beam will be invisible in the water. As silver nanoparticles form, they will scatter the light, making the laser beam clearly visible. This is the Tyndall effect, and it’s your best indicator of progress. Your goal is a finished solution with a faint, pale-yellow tint. Safety Warning: If the water turns dark, grey, or black, you have let it run for too long. This is a critical safety point, as over-brewing creates larger particles. It’s why so many people ask, Are colloidal silver supplements safe?, because poor quality control can lead to issues. Always aim for that light golden hue and nothing more.
Step 4: Filtering and Storing Your Colloidal Silver
Once you’ve achieved that perfect pale-yellow color, you’re done! It’s time to finish up and store your batch.
- Safety First: Always disconnect the power source completely before handling the rods or the solution.
- Carefully remove the silver rods. You’ll see a dark grey oxide layer on one of them. Simply wipe this off with a clean paper towel.
- Pour your solution through an unbleached paper coffee filter into a dark glass bottle (amber or cobalt blue works best).
- Store your bottle in a cool, dark cupboard, away from direct sunlight and electrical appliances.
Common Mistakes and How to Avoid Them
When you’re first learning how to make colloidal silver, a little guidance goes a long way. I’ve seen many people get discouraged by a bad batch, but the truth is, the mistakes are almost always simple and easy to fix. Think of this as your personal troubleshooting guide. Let’s walk through the most common pitfalls so you can create a perfect, high-quality batch every time.
Mistake #1: Using the Wrong Water
Problem: The single biggest error is using tap, spring, or even filtered water. These contain minerals and chlorine that react with the silver, creating silver chloride and other unwanted salts instead of pure colloidal silver.
Symptom: Your water will turn cloudy or milky white, often very quickly. This is a clear sign of a contaminated, useless batch.
Solution: There’s no saving it. Discard the batch immediately and start over using only pure, steam-distilled water. This is non-negotiable for a safe and effective solution.
Mistake #2: The ‘Runaway’ Reaction
Problem: Sometimes the process can accelerate too quickly. This creates large, less effective silver particles that are too heavy to stay suspended in the water.
Symptom: The water turns a dark grey, black, or muddy color, and you may see black sediment forming at the bottom of the jar. A good batch should be clear or have only a faint, light yellow tint.
Solution: Monitor the process. If you see dark streams coming off the rods, give the water a very gentle stir with a non-conductive utensil (like a glass rod or plastic spoon) to disperse the ions more evenly.
Mistake #3: Letting the Rods Touch
Problem: If your silver rods touch while the generator is on, it creates a direct short circuit. This immediately stops the electrolysis process that creates the silver particles.
Symptom: Production stops. You won’t see the fine mist of particles, and the indicator light on your generator may go out. This can potentially damage your power supply.
Solution: Always ensure your rods are securely fastened, parallel to each other, and with enough space that they cannot drift and make contact. A well-designed generator helps prevent this.
Mistake #4: Improper Storage
Problem: Freshly made colloidal silver is sensitive. UV light from the sun and the electrostatic charge from plastic containers will neutralize the silver ions, causing them to lose their charge and clump together.
Symptom: The solution loses its potency, and you’ll eventually see the silver particles settle as a grey film on the bottom of the container.
Solution: Always store your finished product in dark-colored glass bottles. Keep them in a cool, dark cupboard away from direct sunlight and major electronic appliances to preserve their charge and effectiveness for months.
The Bob Beck Connection: A Key Part of the Protocol
If you’ve researched alternative health tools, you’ve likely come across the name Bob Beck. A physicist with a passion for empowering individuals, Beck didn’t just advocate for a single device; he developed a complete, four-part protocol designed to be used at home. Learning how to make colloidal silver was the crucial fourth step in this system, and understanding its role gives context to why this simple solution is so valued.
Beck saw his protocol as a comprehensive approach. The first three parts-blood electrification, magnetic pulsing, and drinking ozonated water-were the primary tools. Colloidal silver was the essential follow-up.
Why Bob Beck Recommended Colloidal Silver
In Beck’s research, he considered colloidal silver the secondary support system. After using blood electrification to address microbes circulating in the bloodstream, he recommended taking ionic colloidal silver to handle any that might remain elsewhere in the body. It was the final piece of the puzzle, ensuring the entire system was addressed. For him, this wasn’t just a supplement; it was the completion of a self-guided health protocol. (Please note: This is presented as historical information based on Bob Beck’s work and is not a medical claim.)
From DIY to Dedicated Devices
The DIY battery method we’ve outlined is a fantastic starting point and true to Beck’s spirit of self-sufficiency. However, for consistency and quality, a dedicated device is superior. A quality colloidal silver generator does more than just pass electricity through silver; it precisely controls the voltage and current. This is critical for creating a solution with a consistent, small particle size, which is what you want for the best results. It removes the guesswork and potential for error.
While a simple setup works, modern tools have made following these protocols easier and more reliable than ever. See how modern devices simplify health protocols. Learn about our approach.
Your Journey into Health Empowerment Begins Here
You now have the fundamental knowledge of how to make colloidal silver safely and effectively in your own home. By gathering the right tools, understanding the simple science, and avoiding common mistakes like using impure water, you are fully equipped to create high-quality batches. This process puts you in control, moving you from being a passive consumer to an active participant in your own wellness.
As you’ve learned, making ionic colloidal silver was a cornerstone of the research by Bob Beck. This isn’t just a business for us; it’s a passion project from a fellow health hobbyist dedicated to these principles. We build our tools based on Bob Beck’s original work, and to ensure you get the best results, every single device is personally tested before it ships. We invite you to explore the complete Bob Beck Protocol and the tools that support it.
You’re not just following a recipe; you’re taking a powerful step in your personal health journey. The power to create is now in your hands.
Frequently Asked Questions
What color should my final colloidal silver be?
Your finished colloidal silver should be crystal clear, like pure water. At higher concentrations (around 20 PPM), it might have a very faint, pale yellow tint. If you see any darker colors like amber, brown, or gray, it’s a sign that the silver particles are too large and have clumped together, or “crashed.” This often happens from using tap water instead of distilled water, so always stick with pure distilled water for the best results.
How long does it take to make a batch of colloidal silver?
The time it takes depends on your generator, the amount of water, and your target Parts Per Million (PPM). For a standard 16-ounce batch aiming for 10-15 PPM, it typically takes between 3 to 4 hours. It’s more important to watch for the faint yellow color and use the Tyndall effect to check your progress than to just rely on a timer. Patience is a key part of learning how to make colloidal silver properly.
Can I use a TDS meter to accurately measure the PPM?
No, a TDS (Total Dissolved Solids) meter is not a reliable tool for measuring the PPM of colloidal silver. These meters are designed to measure dissolved mineral ions, not suspended, non-conductive silver nanoparticles. Using one will give you a very inaccurate, low reading and may cause you to run your generator for too long, resulting in large, poor-quality particles. It’s better to trust the process and visual indicators like the Tyndall effect.
What is the Tyndall effect and how do I use it with a laser pointer?
The Tyndall effect is the best way to visually confirm you have a true colloid. Take your finished batch into a dark room and shine a red laser pointer through the side of the glass container. If you see a clear, visible red beam passing through the water, it means the light is scattering off the suspended silver nanoparticles. This simple test proves your production was successful. If you don’t see a beam, no colloid is present.
What is the average shelf life of homemade colloidal silver?
When stored correctly, homemade colloidal silver has a shelf life of about three to six months. To ensure it lasts, you must store it in a dark-colored glass bottle, like amber or cobalt blue, and keep it in a cool, dark cabinet. Never refrigerate it or expose it to direct sunlight, as this can cause the silver particles to lose their electrical charge and fall out of suspension, making it much less effective over time.
Is it normal for a black residue to form on the silver rods?
Yes, it is completely normal to see a black or gray residue, especially on the positive silver rod. This is silver oxide, which is a natural byproduct of the electrolysis process. It’s important to wipe this residue off your silver rods with a paper towel or a gentle scouring pad after every use. Keeping your rods clean ensures that you create a pure and high-quality batch of colloidal silver every time.